I’ve had three rings resized in the last two years. All three times, I thought I knew my size. I didn’t.
The third time a beautiful silver band ordered online came back from the jeweler with a resize fee and a slightly thinned shank. That’s when I decided to actually figure out how to measure ring size correctly at home, instead of guessing or trusting the “wrap a string around your finger” advice that kept failing me.
Here’s what I discovered: most home methods work fine, but there are two specific mistakes that make all of them inaccurate. Avoid those, and you’ll nail your size on the first try.
| Quick Answer: The most accurate at-home method is measuring the internal diameter of a ring that already fits you well. If you don’t have one, use the paper strip method—but measure in the evening when your fingers are at their largest, and size up by half if you’re between two sizes. |
Why Getting Ring Size Wrong Is So Common
Fingers change size more than most people realize. Temperature, time of day, hydration, and even salt intake affect finger size by as much as half a size up or down throughout a single day.
I measured my own finger at 7 AM one morning and got a US size 6.5. Measured again at 7 PM after a salty dinner: it read closer to a 7. That’s the difference between a ring that fits perfectly and one that won’t go past the knuckle.
Most online tutorials skip this entirely. They tell you how to measure but not when to measure. That’s the hidden reason people still get it wrong even after “following the steps.”
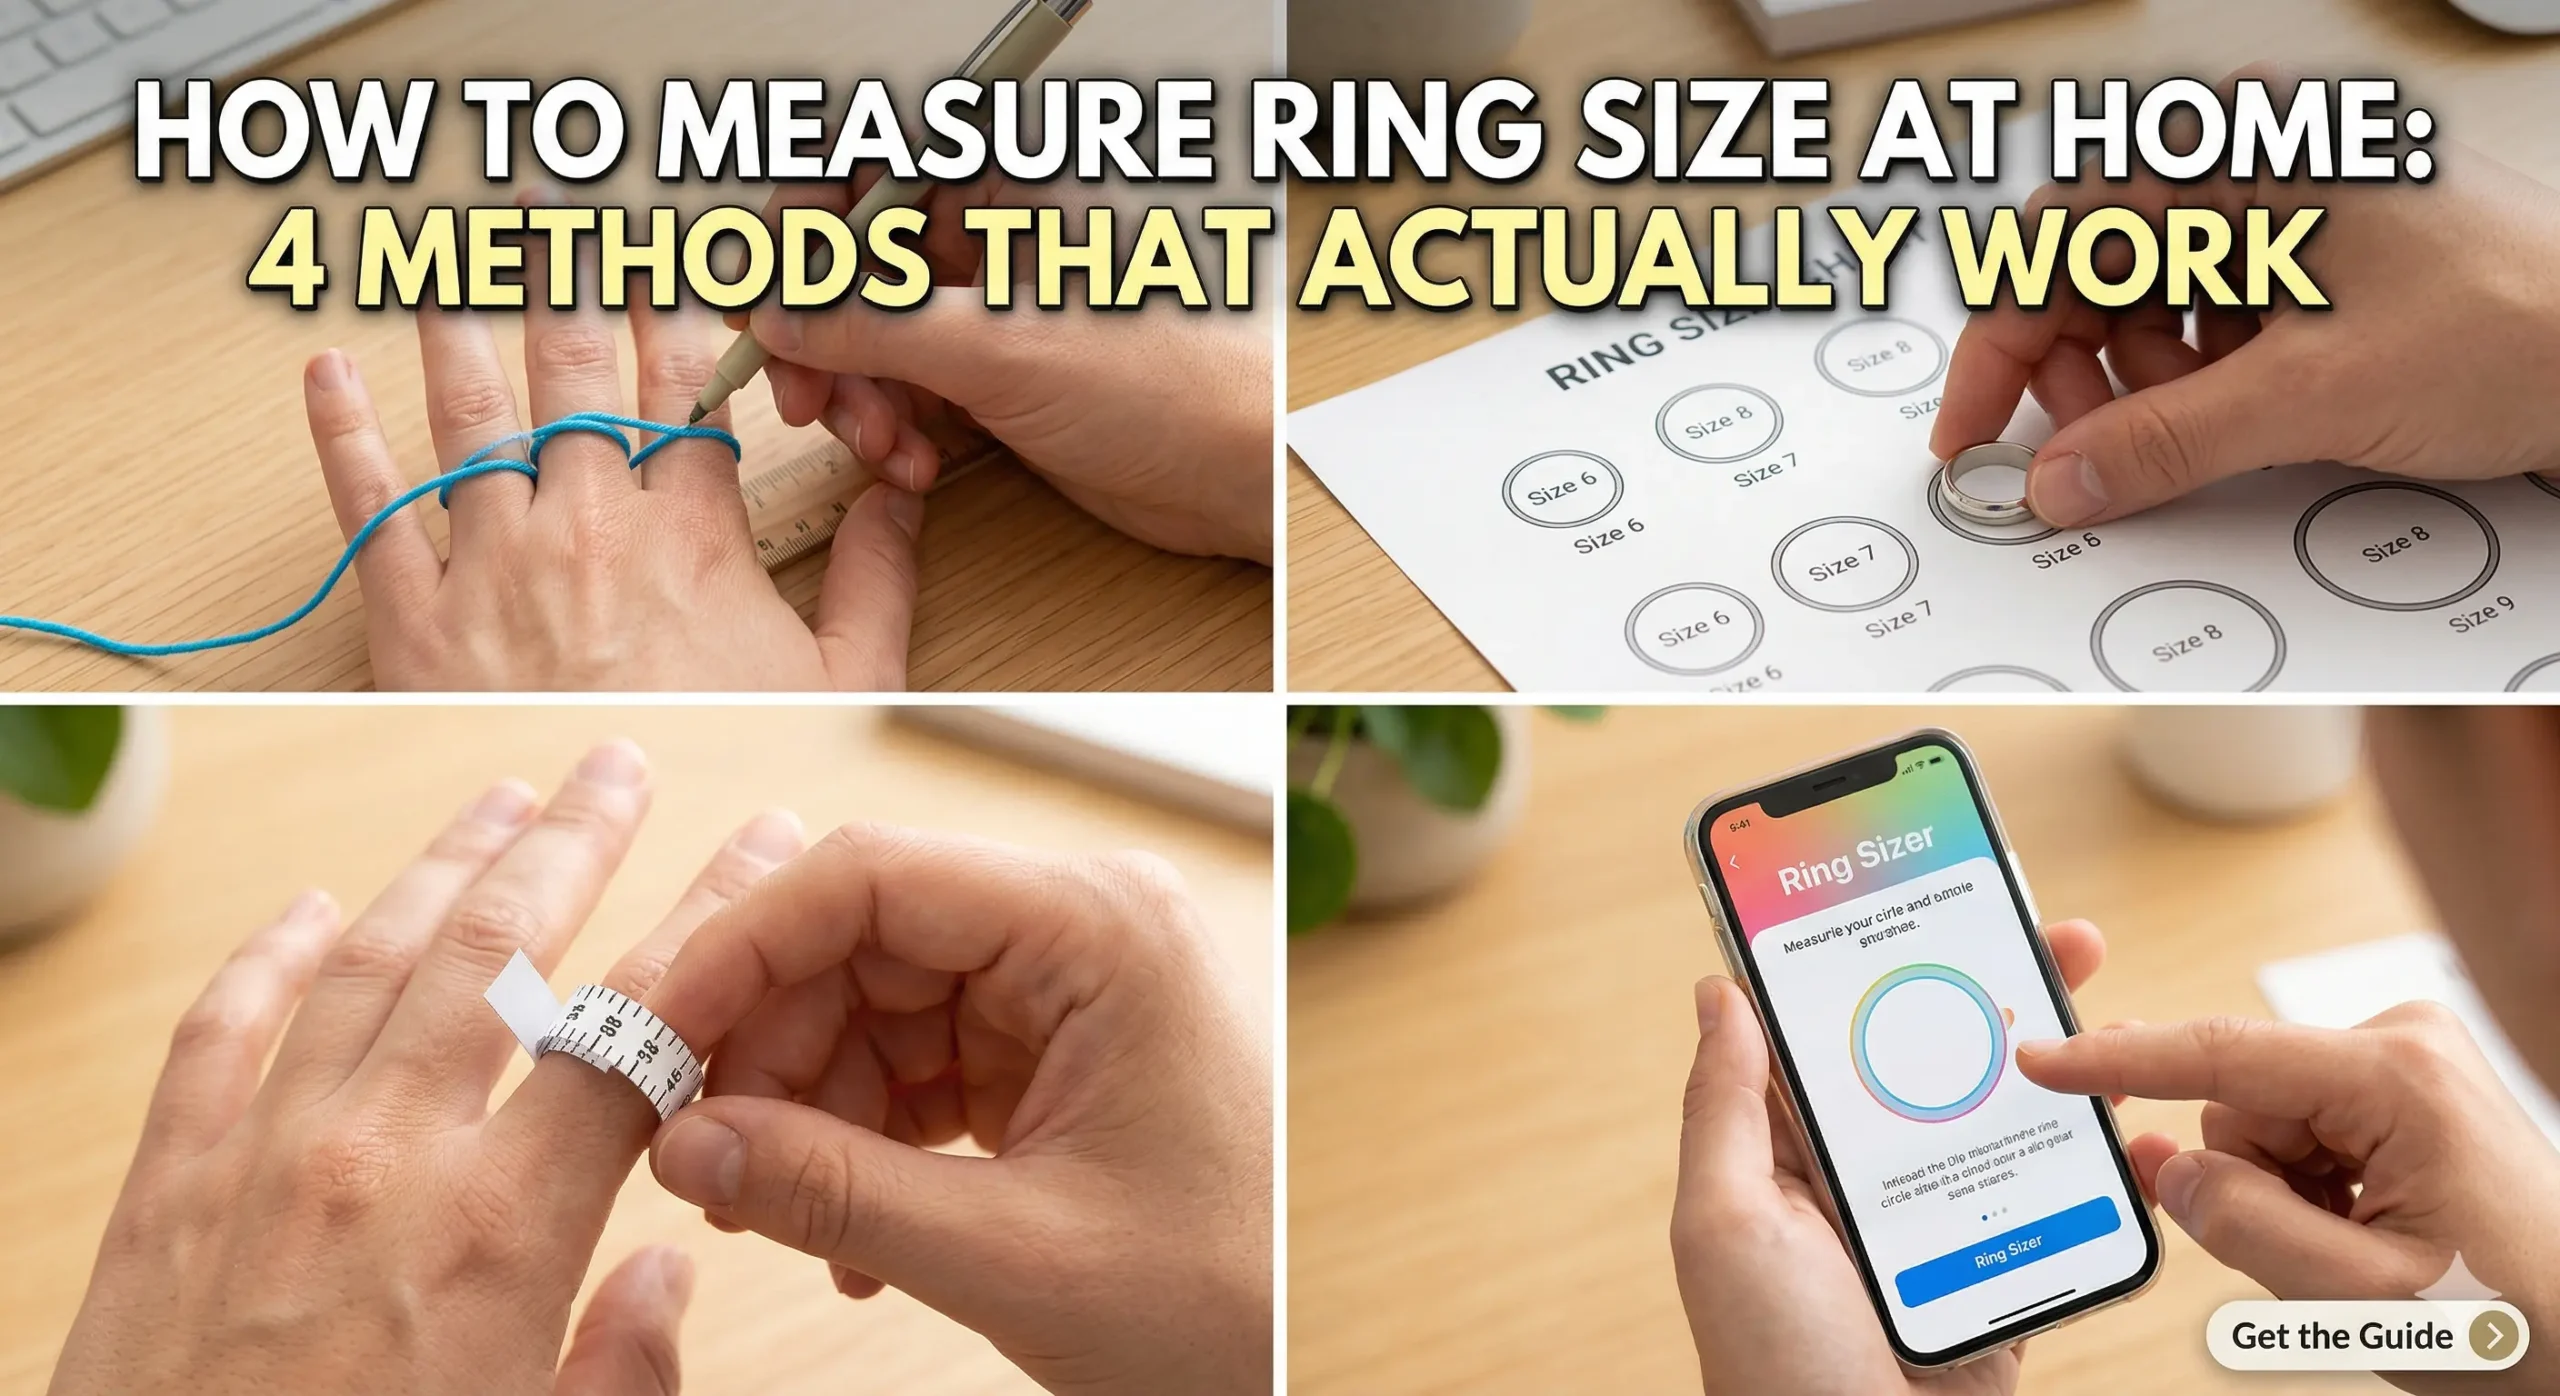
Measure Ring Size 4 Methods At Home
Method 1: Measure an Existing Ring — Most Accurate
If you have a ring that fits the intended finger perfectly, this is your most reliable path. No string, no paper strips—just a ruler and 60 seconds.
What you need: A well-fitting ring + a ruler with millimeter markings.
- Place the ring flat on a white piece of paper or on a table.
- Measure the inside diameter — the distance from one inner edge to the opposite inner edge — in millimeters.
- Use the size chart below to convert that millimeter measurement to your ring size.
| 💡 Pro Tip: Measure the inside diameter, not the outside. The inside measurement is what matters — it tells you the actual space your finger occupies inside the ring. |
When I did this with my go-to silver ring, I got 17.3mm, which converts to an Indian size 11 / US size 7. That reading has been accurate every single time since — no more resizing fees.
Method 2: Paper Strip Method — Highly Accurate ✓
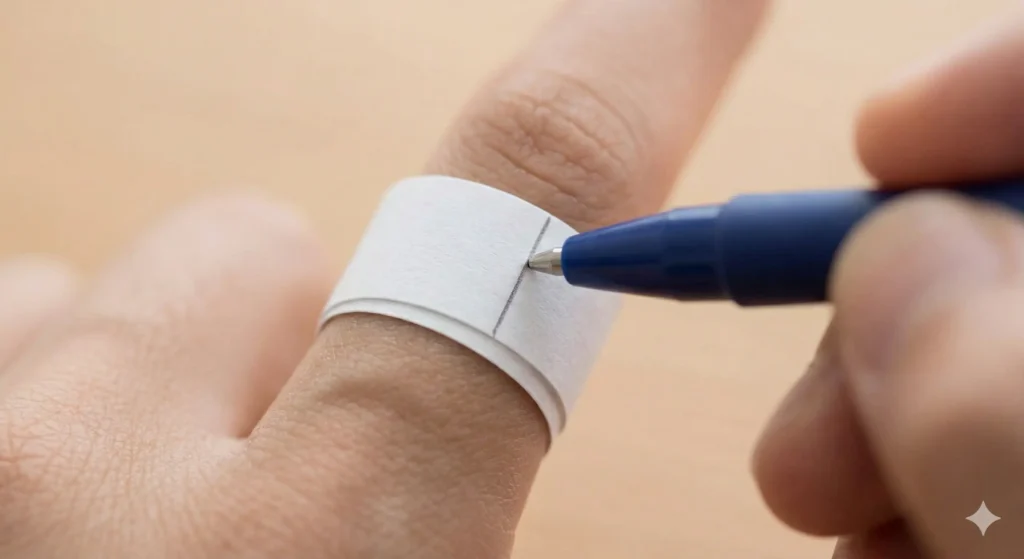
This is the method most people try — and most people do slightly wrong. Done right, it’s genuinely reliable.
What you need: a thin strip of paper (about 1 cm wide), a pen, scissors, and a ruler.
- Cut a strip of paper roughly 10cm long and 1cm wide. Thin is important—thick paper adds false millimeters.
- Wrap it snugly around the base of your finger—not too tight, not loose.
- Mark exactly where the paper overlaps itself with a pen.
- Lay it flat and measure from the end to your mark in millimeters. This is your finger’s circumference.
- Divide that number by 3.14 to get your diameter, then find your size in the chart below.
| ⚠️ Watch Out: The strip must pass over your knuckle comfortably. If the ring needs to go over a wider knuckle, wrap the paper around the widest part of that knuckle instead, then size up by half if there’s a difference of 0.5mm or more. |
| 💡 Pro Tip: Do this measurement 2–3 times and take the largest reading. Fingers are never perfectly cylindrical — one wrap might catch a crease or miss a subtle swell. |
Method 3: String or Thread Method — Easy
Same concept as the paper strip but with string. Slightly less accurate because string can stretch and doesn’t lie flat against the finger as cleanly as paper.
Use non-stretchy thread or dental floss for the best results. Avoid yarn or elastic thread—they compress and give you a reading that’s too small.
The process is identical to the paper method: wrap around the finger, mark where it meets, then measure that length flat against a ruler.
| 💡 Pro Tip: If you must choose between paper and string, go with paper. It’s stiffer, lies flatter, and gives a more consistent circumference reading every time. |
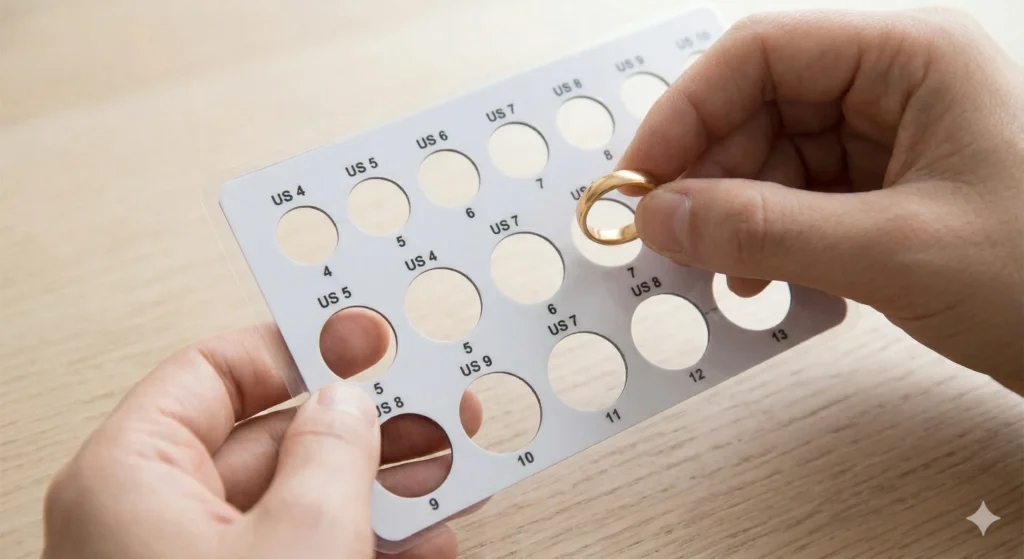
Method 4: Printable Ring Sizer — Convenient
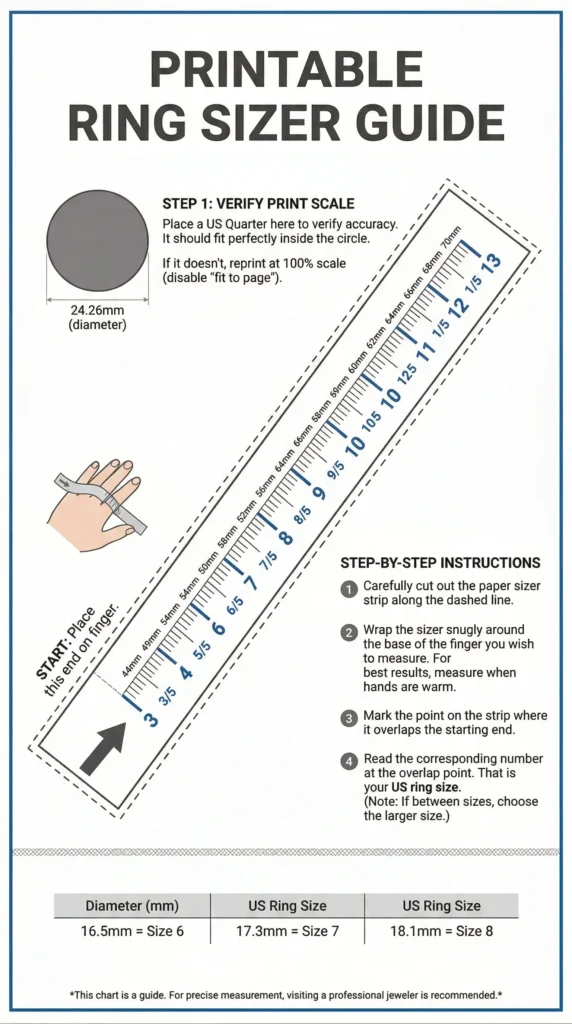
Many jewelry websites offer a printable ring sizer, a page of circles at exact sizes you place your ring over. These work well, but only if your printer is calibrated correctly.
Most printers scale slightly. I printed one once, compared it against my ruler, and found the circles were printing about 4% smaller than actual size. That’s enough to throw your reading off by half a size.
Always verify: Most printable sizers include a 1-inch or 2-inch reference bar. Measure it after printing. If it doesn’t match, adjust your printer’s scale settings and reprint before using.
Ring Size Conversion Chart
Once you have your millimeter measurement (diameter or circumference), find your size across common international standards. The highlighted row is the most common size range for adult women in India (US 7 / India 10–11).
| Diameter (mm) | Circumference (mm) | India / Asia | US / Canada | UK / Australia |
| 14.9 | 46.8 | 4 | 4 | H |
| 15.3 | 48.0 | 5 | 4.5 | I |
| 15.7 | 49.3 | 6 | 5 | J½ |
| 16.1 | 50.6 | 7 | 5.5 | K½ |
| 16.5 | 51.8 | 8 | 6 | L½ |
| 16.9 | 53.1 | 9 | 6.5 | M½ |
| 17.3 | 54.4 | 10–11 | 7 | N½ |
| 17.7 | 55.7 | 12 | 7.5 | O½ |
| 18.2 | 57.2 | 13 | 8 | P½ |
| 18.6 | 58.5 | 14 | 8.5 | Q½ |
| 19.0 | 59.7 | 15 | 9 | R½ |
| 19.4 | 61.0 | 16 | 9.5 | S½ |
| 19.8 | 62.2 | 17 | 10 | T½ |
The Two Mistakes That Ruin Every Measurement
I made both of these before I understood what was happening. They’re worth real attention.
Mistake #1: Measuring in the Morning
Fingers are at their smallest first thing in the morning, typically by half a size. If you measure then and order a ring, it’ll fit fine at 8 AM but feel tight by 6 PM.
The fix: Measure in the late afternoon or evening. If you tend to retain water (common during warmer months or after salty meals), measure on a day that feels average for you—not your most-swollen worst day, but definitely not your most-shrunken morning either.
Mistake #2: Measuring Only Once
One measurement isn’t enough. Measure the same finger 3 times across 2 days and take the largest consistent reading as your true size. I now keep a note in my phone with my measurements and the date; it takes 30 seconds and has saved significant money in resizing fees.
| Personal Note: The measurement that changed everything: I finally measured at 6 PM on a regular Tuesday, three times back-to-back, and averaged the readings. Every ring I’ve ordered since has fit perfectly on the first try, with no jeweler visits and no extra fees. |
Special Situations Worth Knowing
Wide Bands vs. Thin Bands
A wide band, anything over 6 mm, sits higher on the finger and needs to be sized up by half compared to a thin band. This is genuinely non-obvious, and most online guides don’t mention it clearly enough.
If you’re buying a statement ring or a thick wedding band, add 0.5 to whatever size your measurement gives you. A ring that’s a perfect size 7 in a thin band will likely need to be a 7.5 if the band is 8–10mm wide.
Knuckle Larger Than Finger Base
Some people have knuckles noticeably wider than the base of their finger. If the ring needs to pass over the knuckle to sit at the base, size for the knuckle and then use a ring adjuster or snug-fit insert to keep it from spinning. These cost very little and solve the problem cleanly.
Buying a Surprise Gift
When measuring someone else’s ring size without them knowing: borrow a ring they regularly wear on the intended finger and use Method 1 (internal diameter). That’s the most discreet and accurate approach. If you can’t borrow a ring, rely on the jeweler’s return or resize policy and aim slightly larger rather than smaller.
| The one thing to remember is to measure in the evening, measure more than once, and when you’re between two sizes, size up. That’s genuinely all there is to it. The method matters less than the timing and repetition. Your best first step right now: find a ring that fits well on the finger you’re buying for, measure its inner diameter in millimeters, and look it up in the chart above. You’ll have your size in under two minutes, and you’ll get it right the first time. |


Leave a Reply